Reference Manual
![[Back]](back.gif)
|
Reference Manual |
|
NAME
nat32.exe - the NAT32 ExecutableSYNOPSIS
nat32 [nifs|config|a [[A|a][B|b][C|c][D|d][n][s]]]

      nifs = number of interfaces
    config = configuration mode
         a = auto-configure (see below)

         A = Admin   a = No Admin
         B = Browser b = no Browser
         C = Console c = no Console
         D = Debug   d = no Debug
         n = no user.txt script
         s = run as if a service
DESCRIPTION
NAT32.EXE is the executable file for the NAT32 application.NOTESArgument nifs specifies how many [1..16] Network Interfaces are to be used. For each Interface requested, NAT32 will open a configuration file called ifnx.ini, where x is in the range [1..16]. If the specified configuration file does not exist, NAT32 displays a Network Configuration Dialog Box to obtain the needed configuration information.
If argument nifs is 0, NAT32 will use Winsock networking only and the WinPkFilter device driver need not be installed. The switches have the following semantics:
      A = Turn Administration on or off.

      B = Embed a Browser in Console windows.

      C = Create a Console window.

      D = Create a Monitor window for debug output.

      n = Do not execute the user.txt script file.

      s = Run NAT32 as if it were a service.
The switch combination abcd makes NAT32 run without any user interface at all. In this case, the only way of interacting with the application is via its Web Interface, and then only if the NAT32 HTTPD was started in file startup.txt.
NAT32 supports LAN, WLAN, WWAN, Bluetooth and Dial-Up Networking Interfaces. An interface can be running in its native mode or a special mode such as PPPoE or VPN mode. Note that only Microsoft PPTP VPN and OpenVPN interfaces have been tested to date. Other VPNs will be supported in future releases.
If no arguments are specified, or if the config argument is specified, the program displays the NAT32 Configuration dialog box.
This dialog allows the user to check Windows TCP/IP settings, dial connections, and execute pings to test the reachability of hosts on the Internet and on the private LAN. If any tests fail, clicking Help will show several tips on how to solve the problem.
Before you continue, it is essential that the Windows TCP/IP protocol has been correctly configured on all adapters, that at least one valid DNS Server address has been specified (click Help to check this), and that all hardware components (cables, switches, hubs etc) are working correctly. If you are running a software firewall, be sure it is not blocking NAT32 traffic.
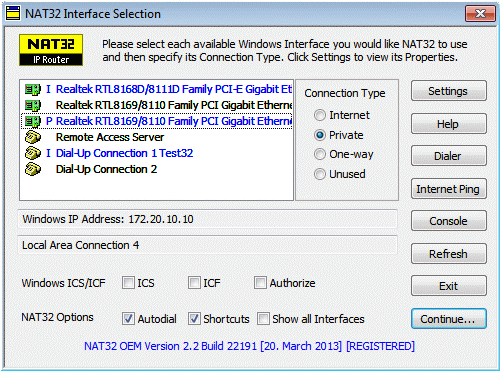
When all adapters are functioning correctly, clicking Continue will display the Interface Selection dialog.
You should now select each interface you would like NAT32 to use, and specify its Connection Type by clicking the appropriate radio button.
If Dial-Up Networking adapters are to be used, be sure the desired connections are established at this time. If need be, click the Dialer button to dial a connection, then click Refresh to update the display. The Autodial checkbox controls the Master Autodial switch and should normally be turned on. This will not necessarily make NAT32 autodial a connection, as interface-specifc autodial options will be specified later.
On platforms running Windows ICS, the Windows ICS checkbox should be off, unless you wish to run both NAT32 and Windows ICS simultaneously. Click here for a description of some of the known problems with Windows ICS.
The Windows ICF and Authorize NAT32 checkboxes should normally be on but note that the Windows Firewall will not block NAT32's NDISAPI traffic, However, some other firewalls may block NAT32's NDISAPI traffic, so you should consult the vendor's documentation for details on how to allow all traffic from the NAT32 Application.
The example shows three selected adapters: an Internet Adapter, a private LAN Adapter and an Internet-connected Dial-Up Networking Adapter.
Some adapters may be displayed in red. Those adapters either do not exist at present (but were once present in the system), or they are unconnected USB adapters, or they have been disabled by the user, or their cable is disconnected.
The Create Shortcuts checkbox specifies whether or not the Run,
Configure and Web shortcuts are to be created on the current Desktop.


<--- Click to open a Web Interface. Clicking Continue will display an Interface Configuration dialog box for the first selected adapter:
In the above example, the details of the first adapter are shown. It is a LAN Adapter (as distinct from a Dial-Up Adapter) and has been configured under Windows to use the fixed, private IP address 192.168.178.12. It is an Internet-connected adapter and uses the Gateway 192.168.178.1 and the Name Server 192.168.178.1.
NAT32 will use the same IP address on this adapter, and it will be the Main Internet Adapter.The settings shown by NAT32 will generally be correct, and you should only modify them after you have clicked Help and carefully studied the displayed Help information.
Clicking Continue will display the Interface Configuration dialog box for the second selected adapter:
In the above example, the details of the Main Private Adapter are shown. It has been configured under Windows to use the fixed IP address 172.20.10.10, and NAT32 will use 172.20.10.254 on this adapter. All other private machines connecting to this network will use 172.20.10.254 as their default gateway and DNS Server address. A DHCP Server will be active on this adapter, and private machines will be able to configure via this DHCP server.
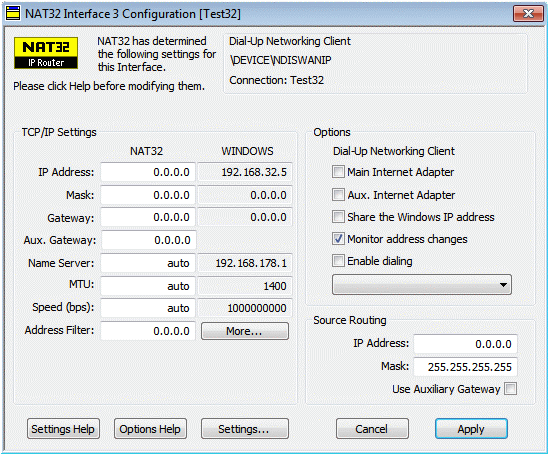
In the above example, the details of a Dial-Up Adapter are shown. Because its IP address details will vary from connection to connection, NAT32 will store 0.0.0.0 IP, Mask and Gateway values in the associated ifn3.ini file.
Once configuration is complete, NAT32 executes the file startup.text in the current directory. When execution of startup.txt is complete, file user.txt is executed. A shell command is then executed and it creates a NAT32 shell in a specified window. When that shell exits, NAT32 processes the exit.txt file and terminates.
While NAT32 is running, the icon
is displayed in the System Tray. Left-clicking that icon displays the Console Window. This is your main means of interaction with the NAT32 application and a powerful UNIX-like command interpreter is available in that window for your enjoyment.
Alternatively, right-clicking the System Tray icon
The Quick dialog appears in the lower right-hand corner of the Desktop and contains toolbar icons and a settings listbox. The icons have the same meaning and functionality as those in the Console. The list box contains a concise display of important NAT32 settings, and any list box entry can be double-clicked to open a dialog box in which the relevant settings can be modified or tested. A single click closes the selected dialog box. A throughput bar shows the current throughput of each Internet interface.
When run in auto-configuration mode (i.e. as nat32.exe a), the following additional options are supported:SEE ALSO
a Auto-configure (normal mode) A Auto-configure (special mode) d Uninstall the WinPkFilter driver D Install the WinPkFilter driver l Use the first available LAN adapter as the Internet interface w Use the WiFi adapter as the Internet interface v Use the Virtual WiFi adapter as the Private interface r Include RAS support Only one invocation of NAT32.EXE is allowed at a time. The supplied program kill.exe can be used to terminate the NAT32 application or service if no other means exist. Never use the Windows Task Manager to terminate any running application, unless you subsequently reboot the system.
NAT32 will not close any established Dial-Up connections on exit, unless a hangup or ras command is specified in the file exit.txt.
The NAT32 home page is http://www.nat32.com/index.html. Please check this page regularly for the latest news and product updates.
ras, exit, hide, ipcfg, ndisapi, netcfg, register, shell, service, startup, termin